Follow on Bloglovin

Pages

Sunday, 5 October 2014

Diane Von Furstenburg Inspired Wrap Dress

Happy Long (sewing) Weekend!


Hope you all are enjoying this Monday off work - although the day has started off a bit grey and gloomy here, I'm hoping for a little sunshine later on!


I had a whole variety of plans for this weekend until I ended up sick from Thursday to about Saturday. Ugh, how unfair does it seem when there is a glorious weekend in front of you but you just feel rotten? Fortunately I was feeling better on Saturday and Sunday and finally back to normal today :-)


So all the usual plans went out the window this weekend. Yesterday however, I did feel the sewing bug. I wasn't looking for too much of a challenge and a quick make was definitely on the cards so I went with my TNT pattern New Look 6429 (now out of print).


This pattern was originally my cousins but we have come to a pattern borrowing/holding hostage arrangement since I have now made 4 of this dress across 2 different sizes...

1..2..3..4...Short sleeves, Long sleeves, No sleeves? Yep think this qualifies as a TNT pattern
Although not a true wrap dress, I always think this design reminds me of those classic Diane Von Furstenburg wrap dresses (especially in this print!). This style flatters pretty much every shape and, just like that other classic - the shirt dress - can be worn practically anywhere! I love that it is a faux wrap since I often have trouble staying in true wrap dresses as I'm short from shoulder to bust which in turn = accidently low cut necklines. The gathering falls right over the area most women are most self conscious about and is part of what makes this such a flattering pattern to wear. Seriously, every time I wear this design I get heaps of compliments from people about how figure flattering it is!


I decided to try something new this time around and finished the neckline with a stretched on band including clear elastic (a la Nettie Dress) instead of the pattern's facings or using non-stretch tape. I was hoping that this would fix the gaping problem that still happens after wearing the dress for a few hours. I am so thrilled to report - it has! This is definitely my favourite finish for knit garments now - I will definitely continue to add this where needed.

Woo! Look No Gaping!!!
I sewed a size 8 and the only alterations apart from the neckline was to shave 1.5cm from the neckline side of the front shoulder seam as I hoped this would help raise the neckline. It did change the fit but I'm not sure if it is almost too high for me now. This change also meant I had to cut out the armholes slightly as they were raised marginally too high after this alteration. What do you think on the neckline position? Too high? I finished the neck band, sleeves and hem with a twin needle.

What do you think? Neckline too high?
How awesome is this fabric by the way??? It's Italian Jersey and is a relic of our March Melbourne Trip. I bought this at The Cloth Shop and while it wasn't cheap, it is definitely the best quality jersey I have ever worked with. And just look at that print!! I LOVE IT!

You can just spot the stretch band I added to the neckline here
The Cloth Shop is a great place to shop if you're around Melbourne, the wonderful staff there really know their stuff and are so friendly and approachable - I really enjoyed shopping there! Plus there is a delicious cafe across the road for lunches on fabric shopping days :-)

Whee!!!!
Hopefully the rest of your day feels like this!!

Happy Sewing!

Stace

OXOX


Saturday, 27 September 2014

New Sewing Room Tour

Why is it that tasks that seem straight forward always end up huge marathons? I originally thought I could easily sort out and organise my somewhat chaotic sewing room in say, a couple of days. I was much more nervous about the prospect of painting my room on my own since I've never done that before and was convinced that it would take FOREVER! Turns out I was wrong on both counts...

But First! The before pictures (I'm not proud of this - but I think it clearly illustrates WHY a sewing room update was needed)


As you can clearly see - this is not a place conducive to creativity, clear-headed thinking or actually being able to find anything! Notice my sewing machine and overlocker aren't even on the desk intended for them - by this stage they had given up on the mess and moved themselves down to the lounge room! Part of the problem with this room is it only has one tiny window that doesn't get much light. They room itself gets plenty of light from the big window in the opposite bathroom. The catch? In Winter this room is easily the coldest in the house so if I put on a heater and close the door to keep the heat in you lose all your natural light no matter what time of day it is. What resulted is I moved sewing down into the front lounge room with our beautiful combustion heater and a lovely view from all the big windows for Winter.

New Sewing Room Pre-Paint
But what's the point of having a sewing room then? So it was executive decision time and so I decided to move into another one of our back bedrooms since it gets better light and change the current sewing room into a guest/spare room instead.


You may also be wondering where the paint colour came from? I've wanted a lemon yellow sewing room for a while now. Sadly I can't wear much yellow near my face as it makes me look like I have jaundice! But it is such a happy, sunshiney colour I wanted to find a way to surround myself with it. The colour is called "Lemon Delicious" by Dulux - so now my sewing room even sounds delectable!


How amazing is this colour? I love how fresh and light it looks, especially with the white shelves and table (all courtesy of Ikea) Also, much admiration is due to these epic shelves installed by the Fabric Folding Assistant (otherwise known as hubby)


I think it is quite amusing that I let my sewing space take over so much - those of you who know me also know how pedantic I can be about being organised and how much I looove my label maker! I have acquired  quite a lot of new sewing things recently when I started StaceyMade Fashion so I think this, combined with such an increase in my sewing activity is to blame. But now I have ample space to store my sewing gear, Hooray!

Onwards to The After Photos!

And Yes, there are lots of them Sorrynotsorry ;-)


Fabric and Patterns and Notions! Oh My!


I got these handy plastic drawers and containers from cheap as chips and they are perfect for storing patterns and fabric. I've sorted patterns by type (sundresses; formal/cocktail dresses; tops; bottoms; outerwear; sportswear; costumes etc.) and I store them in ziplock bags to keep all the pieces together after I've traced them off. The fabric is also sorted by type (cotton lawn; cotton sateen; ponte di roma; jersey; crepe de chine; evening fabrics etc.) and I tried folding it around cardboard strips and sliding it into the drawer or box so I can instantly see all my fabric options. I do have my own special box of fabrics just for me that I could never part with but I was surprised at how much I had that I liked but wouldn't be devastated if a client wanted to use. This process of sorting out and folding did highlight how much of a fabric problem I have - lol looks like I'll be 'shopping the stash' for a while yet!


I even have a pretty view now looking out to our backyard and veggie patch - see the strawberry tower? I'm pretty damn excited about that strawberry tower. We need to get planting soon ready for a Summer harvest, YUM!!!
My Sewing Girls (and the FFA) are up on my wall

I made the cute pin board by covering a cheap cork board from cheap as chips in this upholstery fabric Mum gave me for Christmas last year - don't you love it? I have to have a pin board in my sewing room, it's like Pinterest but in real life lol.

Eventually that cord will be secured to the skirting but I couldn't wait to show you the 'finished' product
Teddy's are clearly the most helpful sewing companions so they have to have a spot!
So there's my new sewing room. In the end the entire transfer took about a week or so - including only a day and a half of painting - the rest was all moving furniture, building storage solutions and sorting! I'm so excited to start working in here - actually I already did some yesterday, as you should be able to tell from the pretty way Merry-the-Mannequin is dressed. It is light, bright, a little girly and a whole lot of creativity. I'll be trying out spots to take pictures in here of my finished makes so expect to see a lot more of these delicious lemon meringue walls!

Glad to share my new space with you - if you have a beautiful sewing space (or dream of one) please share it in the comments! I'd love to see anyone else's favourite creative spaces!

Happy Stitching,

Stace

OXOX

Monday, 22 September 2014

New Blog Feature!

Heya!

Just a quick little blog post to say you can now Follow Me By Email!! Hooray!!

Just enter your email in the field at the top right of my blog and follow the instructions and then you'll get happy sewing emails whenever I post something new. :-) Hopefully this makes my blog a little more accessible to those of you who don't have bloglovin or similar.

I've been super busy this last week working on my lovely new sewing room - can't wait to show you as it is nearly finished and I. Love. It.

So I'm heading back into it and will leave you lovelies to get subscribing ;-)

Cheers!
Stace

Sunday, 7 September 2014

Cherry Bomb! A red hot Nettie Dress

Sewing for myself has been on the back burner for the past few weeks. With one thing and another I suddenly found myself with a pile of orders to fill for StaceyMade :-O which is no bad thing but did mean I wanted to knuckle down a bit and get stuck in.


Fortunately one of those orders was for a new pattern - a Nettie Dress from Closet Case Files. If I've never used the pattern brand or design before I like to make a trial version for me first since I know my shape better than anyone's. This way I can iron out any fit issues or strange sizing etc. before cutting into my friend's fabric. Bonus here was I have been eying the Nettie Pattern since it came out. It looked like such a good basic design and although I doubt I'll ever make the body suit up (maybe as a costume?), the dress can also be altered into a t-shirt so for only $10 or so you get a good basic dress, t-shirt and bodysuit pattern. When I had a friend after this exact design I rejoiced because now I had a reason to buy the pattern finally!


I won't lie, part of the appeal of this pattern was the very low scoop back combined with a built in bra. I adore low backs, particularly in combination with long sleeves and high necklines - I think it is the epitome of understated sexiness. Add in fire engine red fabric and I think this is one hot dress!

Ok maybe not so understated sexy from this side...
I cut a size 6 high neck, low back dress after a LOT of deliberation given the pattern is designed with negative ease and I am not a hugely confident stretch sewer. I have been dipping my toes into stretch sewing this year and I do love how quick and easy it is to sew up but I still struggle with fitting and sizing issues simply because my brain isn't wired to think in stretch fabric terms just yet. The size 6 turned out to be a perfect fit even though the body measurements given for this size were slightly smaller than mine. I think it also depends on what sort of fabric you use so each new make will have to be individually assessed.

I used some cheap and cheerful bright red cotton interlock stretch fabric I bought in Melbourne at G & J's fabrics (I think). It only just had enough stretch to make this dress but as it is a little heavier than a jersey it did help smooth out my silhouette lines in the final dress so :-).


I included a built in bra which I've never attempted before. The process was relatively easy although I wanted to insert foam bra cups to give a little more support than just the standard elastic + fabric set up. They look ok in pictures but in real life they are a little lumpy and poor fitting. I think the main problem is that between buying these cups and making the dress I've lost weight and now the cups are too big. I'm probably going to rip them out and see how it looks without them and if needed I'll buy some smaller, lighter ones to try again with. This sounds quite tricky and there was a lot of mirror scrutiny time but the actual process of inserting the cups was quite easy - I followed the Nettie sewalong on Closet Case Files site and the instructions were excellent and easy to follow for this step :-)


Overall, this is a fantastic basic pattern that is quick and easy to sew up. I finished all the seams on my overlocker and top stitched the neckline and hems using a stretch twin needle. My only DUUUUUH! Moment came when I perfectly attached the neckband using my overlocker only to discover it was attached right side to wrong side! Cue cutting off that band and starting again. As a result of this the back neckline is quite narrow on the shoulders and has a tendency to fall off a little but I don't think this will be a problem if you sewed it normally in the first place!


This was a great run through before making my final version for my friend - she was after the scoop neck and high back version of the dress and since we are the same size (yay) I could try this version on to check fit and there will definitely be a version of this in my life soon, along with a t-shirt version with the medium back using the left over scraps from this project. I'm actually planning a lot more Netties. They are quick and easy to sew up - great instant gratification sewing, they look great on and are super comfy to wear while still looking really polished :-D wins all round!

It's so nice to whip up some quick sewing projects :-) I love beautiful detailed makes but sometimes you just want a finished project right now!

Special special thanks go to my awesome Dad (Happy Fathers Day!) for taking these great photos - so much better than the goober shots I usually take on timer at home ;-)

Happy Sewing!

OXOX
Stace

P.S - If you'd like to see the other version of this dress I made up, head on over to my Facebook page for StaceyMade Fashion at https://www.facebook.com/StaceyMadeFashion

Saturday, 9 August 2014

Coatigan Copy

This was a project which reminded me why I sew for myself. Sometimes I think - I'd really rather just buy that, it'll be so much quicker/cheaper/easier/more instant gratification than making it. 


But when I tried on this "coatigan" (half coat half cardigan) and saw the price at AU$140 I went "nope - I can make it!" and was extremely grateful to not have to commit to spending that money on a store bought garment. 

The original coatigan I tried on...
   

And my version!

I would never have thought that this style of loose, layered coat/jacket would suit me but then again - I'm wearing leggings with it and I never thought those would suit me either! So when I tried it on (admittedly just to see if the silhouette worked) I was really surprised to find it made me feel very sophisticated, like I was in Vogue or something, yet comfy and warm at the same time. Being comfy and warm are starting to become requirements for my own makes now as it is still freezing and I'm tired of being cold or having so many tailored layers on that I can't move!


As soon as I knew I had to have a coat like this I also knew exactly which pattern I needed - Vogue 8930. Despite the somewhat awkward photos on the model I suspected the clean lines of the "cocoon style" coat in this pattern would give me the same feel as the store-bought option. I also knew I had to get my butt back to Ferriers fabric as I had buckley's looking for something so luxe feeling and double sided at Spotlight and Lincraft.

Vogue Pattern + my Sewing Notes
Fortunately Ferriers Fashion Fabric came through for me again and I found the perfect black and white check boucle fabric which I decided to trim with faux leather binding from spotlight.


A word of warning: The faux leatherette bias binding is THE DEVIL'S TRIM!!!! It took me longer to finish the binding than to cut and sew the coat! The inside of the bias is sticky for some reason so no matter what I tried it just would not feed through my machine at an even tension. The result is that the trim is wavy and quite a bit smaller than the edge it follows - it works on such a relaxed look but honestly it was such a nightmare I don't know if I will ever use it again. If I had too I would only ever topstitch it as the 'good' side was somewhat easier to work with though still a nightmare. The only reason this didn't end up in the room of frustration is that I really really wanted to wear it!

The "leather" binding stitched flat on the pockets ok...
but completing this edging was awful!!
The pattern itself is very easy to construct - there is literally I think 4 pieces? I left out the 'inside pocket' since that seemed unnecessary but instead used the biggest pocket pattern piece as the outside pockets. I placed these last so I could make sure they were in the right spot for my hands. This spot ended up being on the bias of the checks and I quite like the look of this unplanned detail.


I cut a size XS of view A, which is the shortest length, since the design is so voluminous and I am quite happy with this fit. I particularly like the bracelet length sleeves - when I wore this out today I added black long gloves and the whole look had a nice vintage feel. Cocoon coats are quite a 1920's style look, just imagine this shape in floor length velvet and you have yourself a Gatsby costume!

Copying the model from Vogue!
I really love the unconscious glamour of this coat - it's relaxed yet chic, modern yet comfy and WARM to boot! I'm not sure if I would make more simply because one of this type of item seems to be enough in my wardrobe. That said, I have had so many comments on this since I made it (and haven't stopped wearing it!) I suspect requests could be coming in soon for similar designs. :-)

This design takes a LOT of fabric - 2.2m and I needed all of it!
Finally, because this hip-happenin-sophistication-plus "coatigan" makes me feel just like I should be in Vogue here is my very best model duckface:

Workin It All SexyLike!!
Hmmmm.. don't call us we'll call you?

Happy Sewing!!!

Wednesday, 6 August 2014

The Cuddliest Trousers - Thurlows the Second

After such a success with my first pair of Thurlows from Sewaholic I definitely wanted to make more of this fabulous pattern.
Slight Goober Face
I also wanted to try a newly discovered fabric spot at Ferriers Fashion Fabric in Adelaide. After being exposed to so many gorgeous fabric stores in Sydney and Melbourne I really wanted to look for smaller stores here in Adelaide that retail different/better quality fabrics. Ferriers came up on this search and since it was only round the corner from work I decided to check it out. If you've read my last post you'll know this was a successful visit since I've been back 3 times since!


On my first visit I really fell in love with this soft grey herringbone pure wool flannel - I saw a brown version of this fabric at The Fabric Store in Sydney but I wear more grey than brown  so I am glad I waited and purchased the grey version instead.


Let me say first off - This Fabric ROCKS my world!! It looks very tailored but due to the soft brushed insides it feels like I'm wearing my PJ's :-D

What's that? You like my pants???
The combination of excellent pattern and beautiful fabric was an almost guaranteed success and I am certain that these are going to become a favourite pair of trousers! I top-stitched the back welt pockets this time and I love the finish so will do this again from now on.

Welt Topstitch Detail - Oooooh!
I lined these pants using the left over cotton lawn lining I cut out for my last pair of Thurlows but couldn't use due to the sheerness of the fabric I was using. Having fun linings and funky buttons always make me happy and isn't that the point of sewing for yourself?

Crazy Fun Linings of Joy
One word of warning - I cut my usual size 4 and sewed a normal back seam allowance which actually produced a pair of pants slightly too big for me. However, I'm extreeeeeemely slack about pre-washing fabric and after the first cold-water wash I found these shrank up quite a lot so they are now the perfect fit. Just something to keep in mind since I've rarely worked with 100% wool fabric in the past but I will certainly continue to use it in the future.

I was really excited to find an actual 4" metal teeth 'trouser zip'
I once again used the Lladybird tutorial and these came together in just over a day. I think this pattern is fast moving to become my TNT pants design - they are constructed beautifully and are easy to fit and wear so wins all around!!
And yes - I do have more fabric to make another pair, this time in pin stripe velveteen once again from Ferriers so more Thurlows shall grace my future blog!

Friday, 1 August 2014

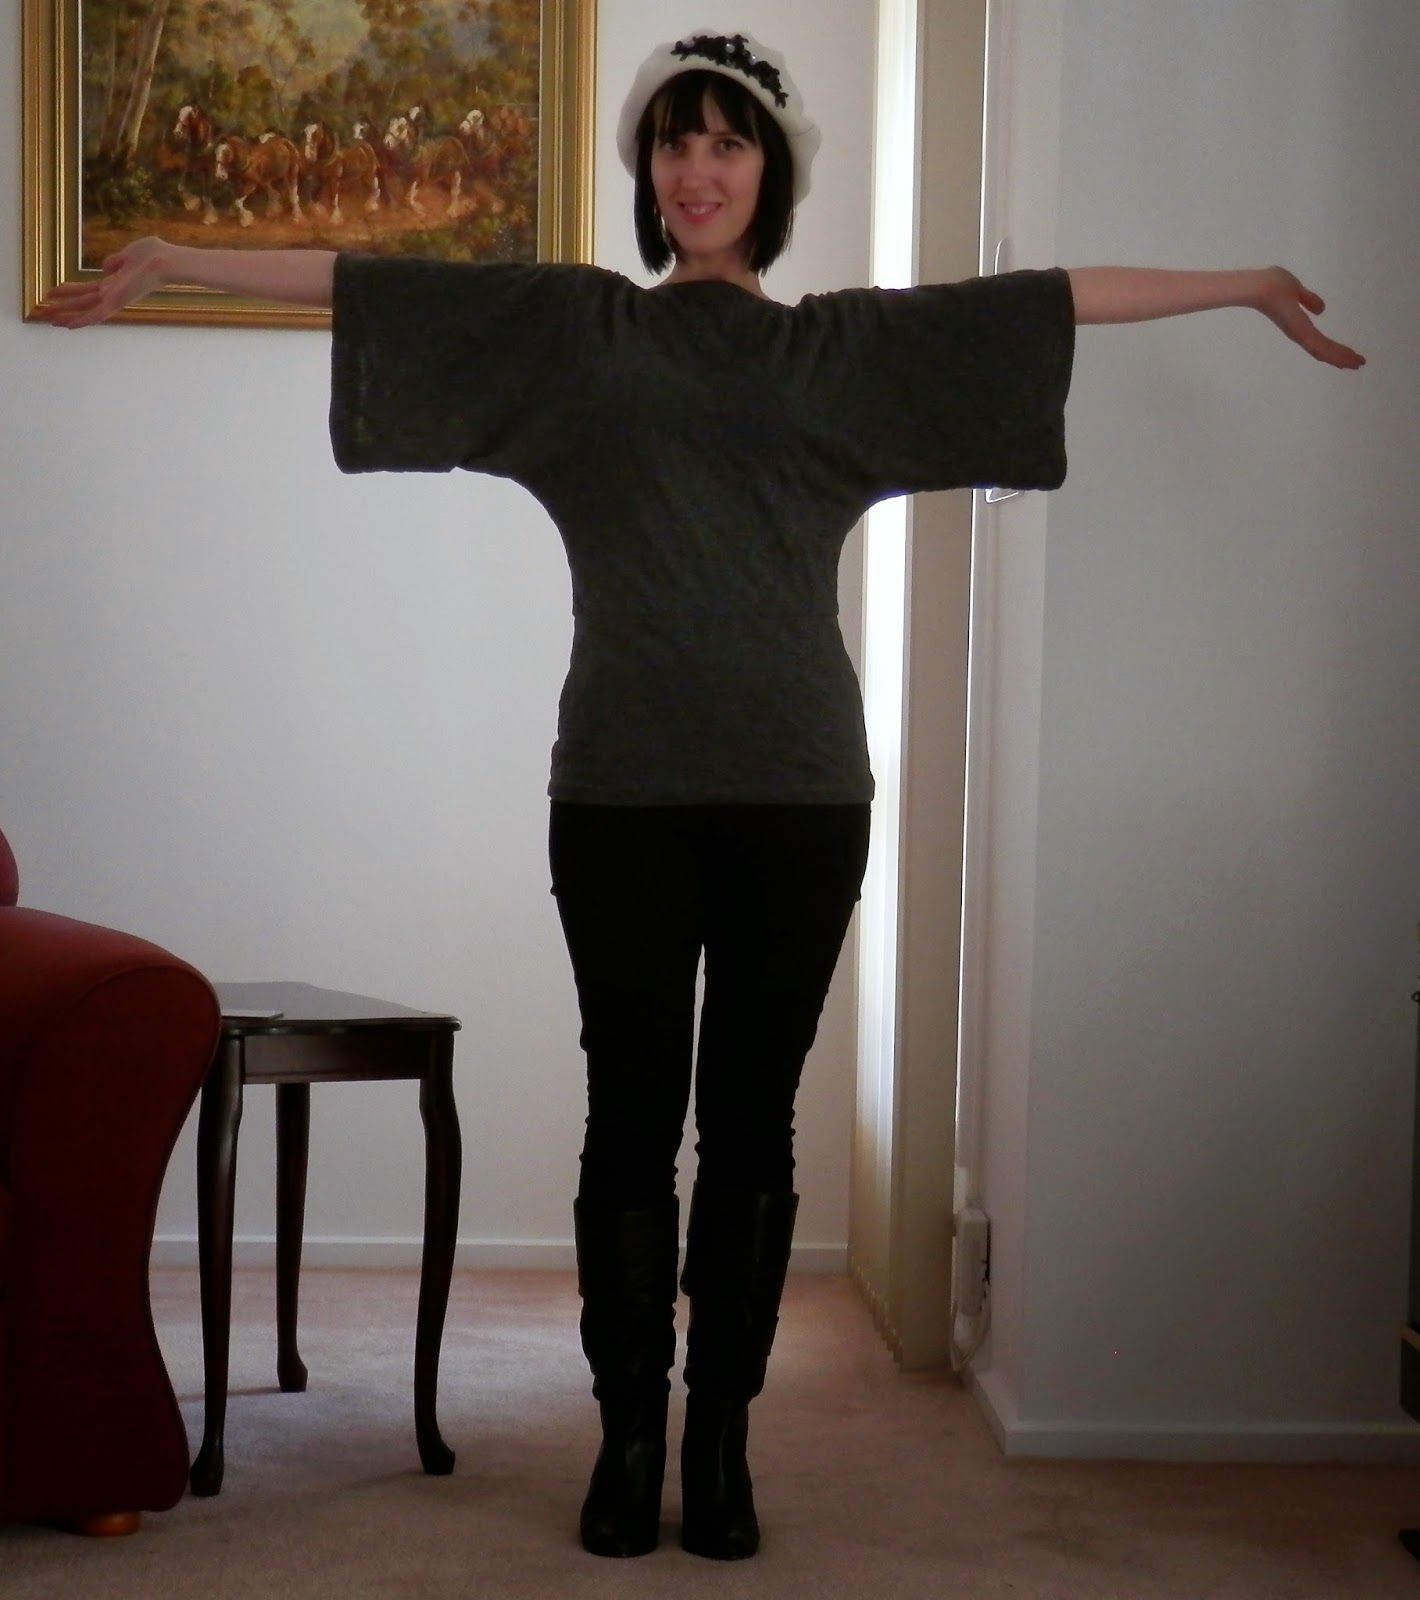
Bat Outta Hell Burda Batwing Top

After my Me Made May adventures I discovered my wardrobe is lacking in comfy, warm winter gear and I've been thinking about how best to fill this gap. Leggings was the first step and now I've moved on to tops.


I've always had a liking for "dancer" style clothing (wrap cardies, circle skirts, ballerina tops and of course batwing or Flash dance style tops or t-shirts). I've always been a dancer at heart so I blame 9 years of jazz dance training for this obsession with ballerina and dancer clothing. I was convinced for years that I couldn't wear the batwing style but as I'm trying to branch out in the styles I wear I thought it was time for another try.


And the great news? I LOVE IT!!!


This is Burda 7866 which I believe is out of print now. I have had my eye on it literally for years so when I saw it marked down on a recent trip to Ferriers Fashion Fabrics along side the perfect fabric to trial the design it seemed fabric fate had brought us together! 


The fabric is a grey, self-pattern knit from Ferriers Fashion Fabrics - these guys have a seriously wonderful selection of fabrics and great service (I've already been back for more fabric to make 2 more versions of this top!). Although not always the cheapest, the quality is amazing. After making up 2 garments in fabric purchased here I can honestly say that slightly pricier fabric is worth it as everything is easier and looks 10 times better in a good fabric. Plus they did have a sale running so this knit wasn't all that expensive in the end. The pattern takes 1.6m for the size 10 I made and while you can squeeze this top out of 1.3m I think you would lose the shaping to the bottom band in the process. So for a whole 30cm of fabric and a nicer shaped top I think sticking with the 1.6m length is best.


Constructing this baby was easy - including tracing the pattern, cutting the fabric and unearthing the second overlocker needle this still only took 3 hours! I think the next one will probably be more like 2 hours (oh yes there will be more of these!!). Everything is cut on the fold where possible to save on seaming during construction. I chose to skip making the matching belt since it felt too fussy to add an unnecessary tie to a simple knit top. As you can see - after attaching the neckline bands this top only has 5 seams and 3 hems to complete. I followed the instructions for attaching interfacing and a neckband to the neckline which was similar to adding bias binding, technique-wise, and am actually really happy with the finish here. Normally I would just add viseoflix and turn the seam allowance but so many people have said how nice the neckline is finished I think I will continue using this method! I sewed all the seams on the 4 thread overlocker with wooly nylon on which definitely helped speed up the process :-)


I really like the simplicity of this top. In a lovely weight knit like this one it drapes and hangs beautifully and I like that the neckline, although high, is quite wide and flattering. I've been wanting to wear this constantly since I finished it and it's certainly going to become a TNT (Tried N True) pattern in the future! Now I just need to work on my pirouettes ;-)