Follow on Bloglovin

Pages

Wednesday, 6 August 2014

The Cuddliest Trousers - Thurlows the Second

After such a success with my first pair of Thurlows from Sewaholic I definitely wanted to make more of this fabulous pattern.
Slight Goober Face
I also wanted to try a newly discovered fabric spot at Ferriers Fashion Fabric in Adelaide. After being exposed to so many gorgeous fabric stores in Sydney and Melbourne I really wanted to look for smaller stores here in Adelaide that retail different/better quality fabrics. Ferriers came up on this search and since it was only round the corner from work I decided to check it out. If you've read my last post you'll know this was a successful visit since I've been back 3 times since!


On my first visit I really fell in love with this soft grey herringbone pure wool flannel - I saw a brown version of this fabric at The Fabric Store in Sydney but I wear more grey than brown  so I am glad I waited and purchased the grey version instead.


Let me say first off - This Fabric ROCKS my world!! It looks very tailored but due to the soft brushed insides it feels like I'm wearing my PJ's :-D

What's that? You like my pants???
The combination of excellent pattern and beautiful fabric was an almost guaranteed success and I am certain that these are going to become a favourite pair of trousers! I top-stitched the back welt pockets this time and I love the finish so will do this again from now on.

Welt Topstitch Detail - Oooooh!
I lined these pants using the left over cotton lawn lining I cut out for my last pair of Thurlows but couldn't use due to the sheerness of the fabric I was using. Having fun linings and funky buttons always make me happy and isn't that the point of sewing for yourself?

Crazy Fun Linings of Joy
One word of warning - I cut my usual size 4 and sewed a normal back seam allowance which actually produced a pair of pants slightly too big for me. However, I'm extreeeeeemely slack about pre-washing fabric and after the first cold-water wash I found these shrank up quite a lot so they are now the perfect fit. Just something to keep in mind since I've rarely worked with 100% wool fabric in the past but I will certainly continue to use it in the future.

I was really excited to find an actual 4" metal teeth 'trouser zip'
I once again used the Lladybird tutorial and these came together in just over a day. I think this pattern is fast moving to become my TNT pants design - they are constructed beautifully and are easy to fit and wear so wins all around!!
And yes - I do have more fabric to make another pair, this time in pin stripe velveteen once again from Ferriers so more Thurlows shall grace my future blog!

Friday, 1 August 2014

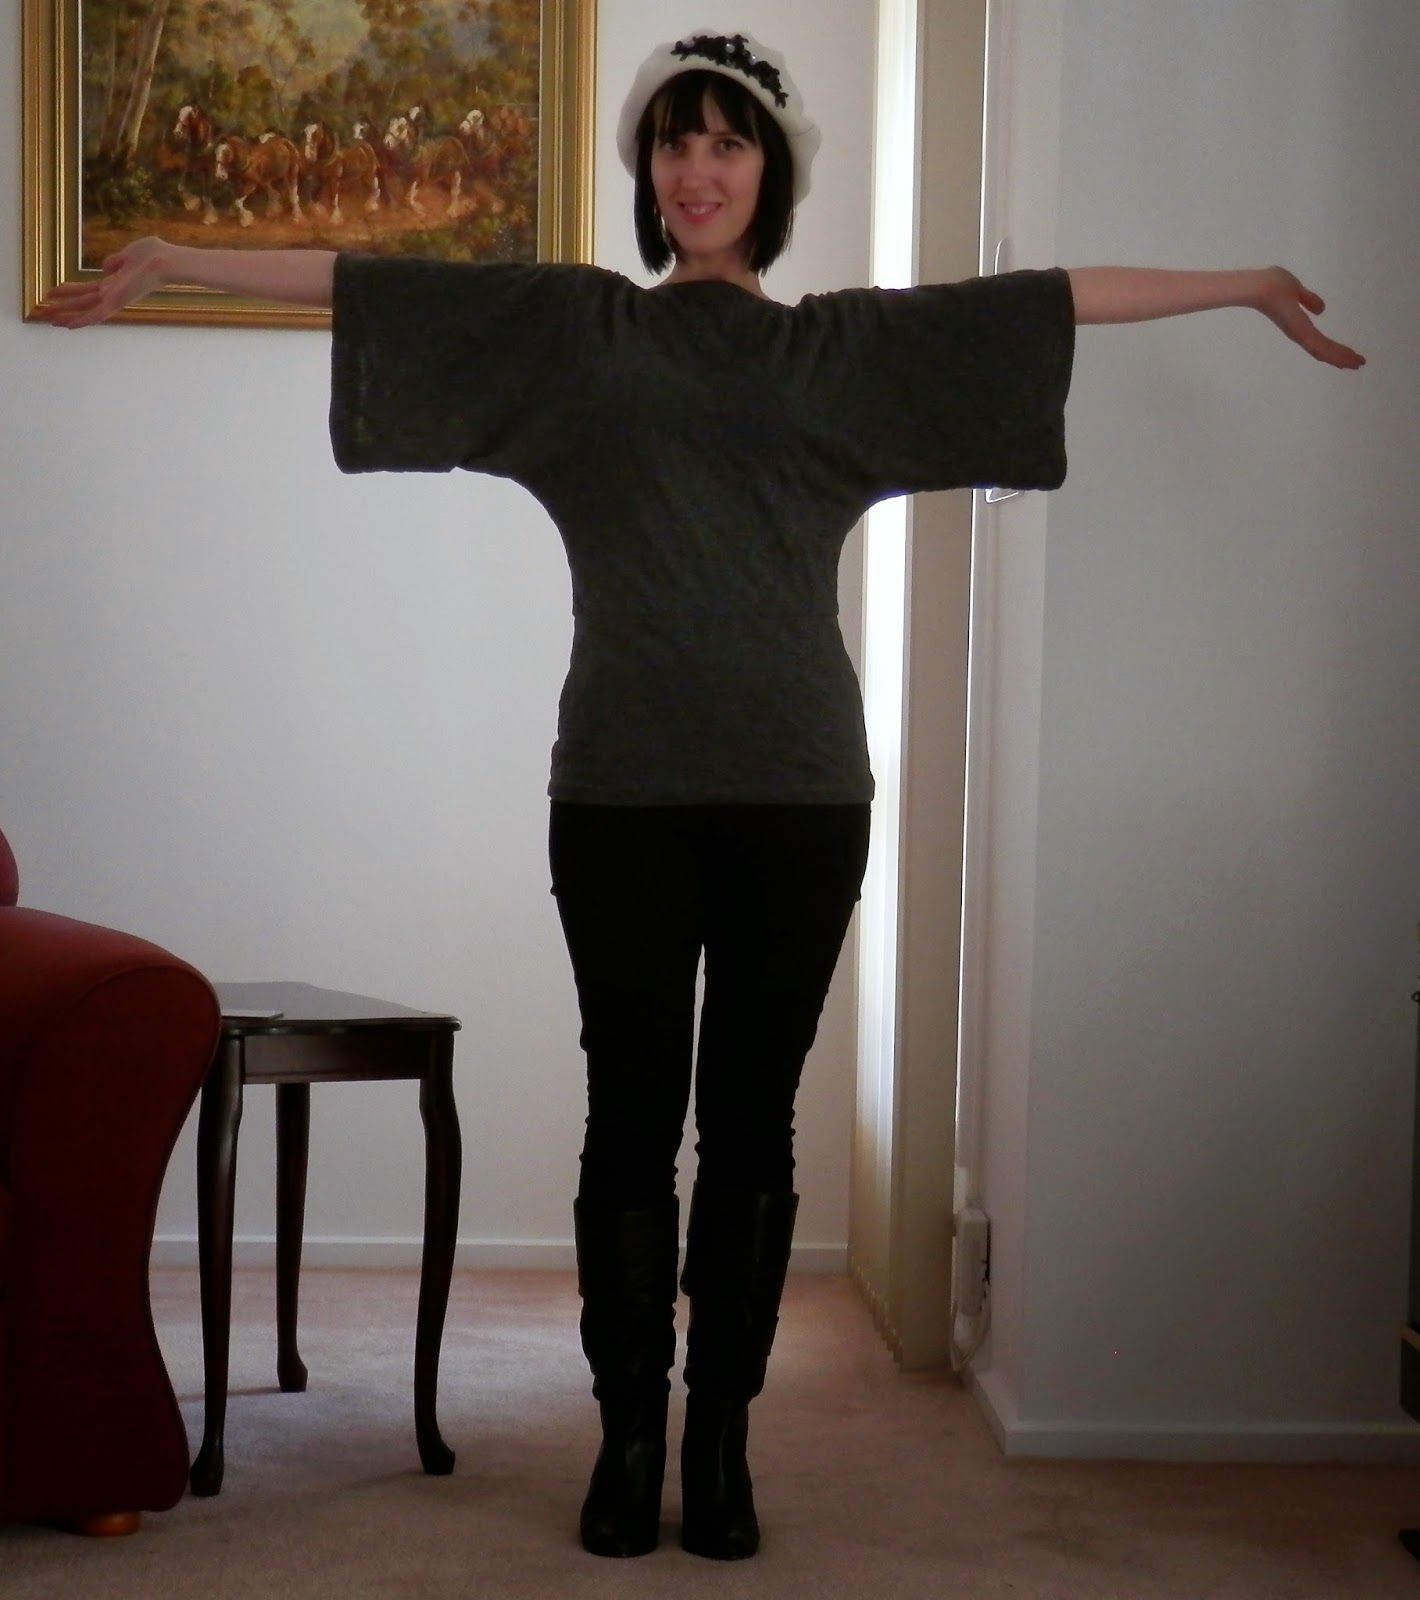
Bat Outta Hell Burda Batwing Top

After my Me Made May adventures I discovered my wardrobe is lacking in comfy, warm winter gear and I've been thinking about how best to fill this gap. Leggings was the first step and now I've moved on to tops.


I've always had a liking for "dancer" style clothing (wrap cardies, circle skirts, ballerina tops and of course batwing or Flash dance style tops or t-shirts). I've always been a dancer at heart so I blame 9 years of jazz dance training for this obsession with ballerina and dancer clothing. I was convinced for years that I couldn't wear the batwing style but as I'm trying to branch out in the styles I wear I thought it was time for another try.


And the great news? I LOVE IT!!!


This is Burda 7866 which I believe is out of print now. I have had my eye on it literally for years so when I saw it marked down on a recent trip to Ferriers Fashion Fabrics along side the perfect fabric to trial the design it seemed fabric fate had brought us together! 


The fabric is a grey, self-pattern knit from Ferriers Fashion Fabrics - these guys have a seriously wonderful selection of fabrics and great service (I've already been back for more fabric to make 2 more versions of this top!). Although not always the cheapest, the quality is amazing. After making up 2 garments in fabric purchased here I can honestly say that slightly pricier fabric is worth it as everything is easier and looks 10 times better in a good fabric. Plus they did have a sale running so this knit wasn't all that expensive in the end. The pattern takes 1.6m for the size 10 I made and while you can squeeze this top out of 1.3m I think you would lose the shaping to the bottom band in the process. So for a whole 30cm of fabric and a nicer shaped top I think sticking with the 1.6m length is best.


Constructing this baby was easy - including tracing the pattern, cutting the fabric and unearthing the second overlocker needle this still only took 3 hours! I think the next one will probably be more like 2 hours (oh yes there will be more of these!!). Everything is cut on the fold where possible to save on seaming during construction. I chose to skip making the matching belt since it felt too fussy to add an unnecessary tie to a simple knit top. As you can see - after attaching the neckline bands this top only has 5 seams and 3 hems to complete. I followed the instructions for attaching interfacing and a neckband to the neckline which was similar to adding bias binding, technique-wise, and am actually really happy with the finish here. Normally I would just add viseoflix and turn the seam allowance but so many people have said how nice the neckline is finished I think I will continue using this method! I sewed all the seams on the 4 thread overlocker with wooly nylon on which definitely helped speed up the process :-)


I really like the simplicity of this top. In a lovely weight knit like this one it drapes and hangs beautifully and I like that the neckline, although high, is quite wide and flattering. I've been wanting to wear this constantly since I finished it and it's certainly going to become a TNT (Tried N True) pattern in the future! Now I just need to work on my pirouettes ;-)

Saturday, 19 July 2014

Lace Me Up - Corsetry at TAFE SA

WARNING: this blog post contains BOOBS. Yes they are there, no I won't apologise for them. *It's a corset for goodness sake.* You Have Been Warned.

This is a course I have been wanting to do for a long time. The WEA used to run a corsetry course waaaay back when and I always wanted to go and try it out, even before I started sewing "for real" as I call it.

Making a goober face
When I discovered that TAFE SA runs a whole series of short fashion courses I was pretty damn excited...Corsetry! Fashion Drawing! Pattern Drafting! So. Many. Options. Of course corsetry was at the top of my list so I signed up for the 3 day course in July for $450.00 (including corsetry supplies) 

Just Look at that Hip Curve - LOOK AT IT!!!
Our lovely teacher Lesley was a total corset afficionardo and had some amazing samples with her to help us pick our design. I originally wanted to make a corset with bust cups since I have no idea how to fit those suckers when they occasionally show up in dress patterns (bombshell dress much??) While I did muslin a cupped corset I eventually decided that I wouldn't wear it much since I just feel self-conscious in anything outerwear that looks like it should actually be lingerie. Maybe I should learn bra-making and then I'll finally master the bust cups?

Muslin with pin-fit adjustments
Since I had such a pretty purple silk dupion for my outer fabric I didn't really want to make a corset that was just for the bedroom so I switched over to the hardest corset pattern in the room (of course) - the Edwardian S-Curve. This beauty doesn't have a straight line on her it seems and there are a million pieces to the design to stitch up. But I was in love and just had to have her!

Close up - Look at all those seams!!
Lesley was a wonderful and very understanding teacher - several of us chose more difficult designs than she had originally intended for the class but she was so encouraging and positive we all felt prepared to put in the extra work to end up with something amazing.

During construction - featuring the hip-curve-of-death
The corset itself has 3 layers - cotton lining for wearing comfort, coutil for structure and support and the outer fashion fabric. Each seam is double stitched on 2 different thread lengths to lock them together when under pressure from the lacing. The boning is 12mm spiral steel. I cut a size 12 then had to take in some excess at the hip and bust but the final corset is still a little big in the hip (I commonly have this problem with corsets -apparently I need hip pads lol) and can almost lace shut at the back. I'm assuming this is how it is meant to fit but next time I would consider sizing down to a 10 just to see if that helped with the proportions. I also added about an inch to the top of the bust as this designs was originally a Demi-cup and I didn't want to be spilling over so-to-speak. I'd was thinking to add another inch again and see if this changed the bust fit in my next muslin just for kicks but looking at these pics I'm not sure that's needed. I was hoping to get a little more waist compression from this corset but when it's on I am actually exactly the same waist measurement as normal - I think maybe a waspie or under bust corset could be a better option for me in this department so that's something to try next time too! And yes, Lesley did inform me that this amount of "platter boob" is how corsets are meant to fit (so sorrynotsorry but the girls are gonna be out for this post hehe)

Eyelets inserted, spiral steel and straight steel bones ready to go in!
The course was great fun, I met some fantastic girls who love sewing just as much as me. No one created the same thing, everyone had such amazing and unique designs - I wish I could see finished pictures from everyone, they were all so fabulous!! We had several wonderful conversations about ready-to-wear fashion devaluing sewing techniques and our pet hates on garment finishes and even ironing - where else would this happen but corset-school? It was also great fun getting to use the TAFE SA facilities at the light square fashion campus (hellooo gravity-feed iron and giant fabric press!!) I had an absolute ball and it even made me consider studying fashion and sewing. That's on the back burner for now but it was a wonderful introduction to the world of fashion study :-)

Laces everywhere
In terms of construction I am overall really happy with how my S-Curve came out although there are plenty of mistakes I could obsess over I am trying to see the bigger picture lol. Probably the biggest error I made was inserting part of the busk backwards! This means the front of the corset doesn't sit as perfectly flat as it should but once inserted there is no going back...but overall this was an intense make and I am pretty chuffed with the final result.

"What this? Oh I just had this lying around"
I'm seriously considering adding appliqué black lace over the hip circles and neckline and/or beading some of the corset for added sparkle. I have enough of this silk left to make a skirt to match the corset but I'm not sure if this look is appropriate for the public - what do you think (some public opinions would really help me out). I could also make a little lace top to go under the corset for modesty but I kind of wanted to let this make shine on her own if possible.

Doing half the chicken dance apparently
My final thoughts on the corsetry process and the course: 
1) corsets are HARD WORK - there is a reason real ones are so expensive- and I would absolutely need to practice a couple more time before even attempting to make a corset for someone else.
2) corsets are FUN and I think once I had the pattern and process down I could get a bit quicker in the construction (this one took me probably 5 days all up, as in 30+ hours sewing!)
3) Lesley is a fabulous teacher - she is soooo knowledgable, positive and encouraging and it was just easy to learn from her - originally I thought this course was a little overpriced but having completed it? It is a bargain!

Table Photo Bomb
I really enjoyed learning sewing technique in a formal setting which surprised me a lot. Many of these short courses are run once a year so I am thinking of making it an annual thing, where I pick a short sewing course once a year to attend and learn new skills etc.


I don't know how quickly I'll make another corset simply because they are a lot of work for a garment that isn't everyday wear but I learned sooo much that can be applied to other garment sewing from this course it almost doesn't matter. I'm sure the corset fairy will visit again however, I do have rather a lot of purple silk in my fabric box after all...

Tuesday, 15 July 2014

Headless Leggings

The title of this post comes from taking photos of these leggings (which went something like - "do you want your head in it? Or do you just want a headless leggings shot?") just in case you were wondering. I seriously never thought there would ever be a day when I would admit that leggings are an acceptable form of leg wear!

This shows the fabric best - all those leg circles are paying off!!

Strangely enough though - now that I have tried making my own I think I will be needing to make some of these up so I always have a pair at the ready!! They are soooo comfy and so long as you choose a heavier opaque fabric you can easily eliminate the see-through-leggings-do-NOT-equal-pants issue that tends to happen with ALL store bought leggings. 

That said - this pair was intended as a wearable muslin and unfortunately is a little too see-through to qualify as pants. I used some strange wet-look, black-on-black leopard print stretch fabric which was great to brush up on my stretch sewing skills and has a cool effect but is quite lightweight so these will be relegated to the "heavy tights" category and always worn with longer tops to cover my butt (literally).

This is how I would normally wear these leggings - under tunics/dresses etc.

The pattern is a very old knitwit gym wear edition from Mum but despite the age, this type of garment really doesn't change. All I altered was to add about 10 inches to the leg to make these long pants. Next time I would probably take 2 inches off the waist band too as these do sit a little high on me.

These literally took me like 2 hours to make - gotta love a pattern with only one piece to cut!!

Part of the reason I wanted leggings is because I am currently working on a 30 day legs and abs challenge and I suddenly noticed that my thighs actually look a bit less jelly-like. I always thought leggings wouldn't flatter me since my legs aren't my best feature but now I am suddenly re-thinking this concept. 

Checking the stretch factor and working on my splits - hello multitasking!
It's great when you try something outside your comfort zone and it actually works - hello whole new world of leggings and stretch sewing!!

Breathe, Stretch and Sew!

Stacey

Friday, 11 July 2014

Some Very Special News

Hello hello!!

I'm back after a bit of an internet hiatus as such - our trip on the Strzelecki and Birdsville tracks was a wonderful break from reality (and technology lol)!
First things first - no I am not pregnant! I'm sure at least one or more person(s) was assuming that so I'm gonna be upfront and say no, no babies here now ;-)


However, I do have a bit of an exciting announcement - I am starting a project called StaceyMade Fashion!


I met the lovely Pemily from The Pin Up Lounge in Port Adelaide a few weeks ago and she was SO excited about my home sewn clothes and asked me if I had ever considered selling the things I make. I have been thinking along those lines lately (after years of swearing I would NEVER sew for anyone but me!) so I have actually taken her up on the offer in a small-side-project kind of way.

Halter Dress in Cotton Rayon blend, Size 10
So I have been cloistered away the past week or so, whipping up a handful of lovely frocks that I've been wanting to make for myself - the catch is I'm not keeping them. Instead these lovely items will be available for purchase through The Pin Up Lounge's lovely clothing boutique! I have started small and all these dresses are my size (Australian size 10-12 roughly) so I didn't have to think to hard about pattern changes/fit etc. If there are people looking for these styles in a different size or a custom design/fit I'll consider branching out.

Sheath Dress in Cotton Sateen, Size 12
Please note this is still only going to be a part of my life (I suspect I will still have to have a 'real job' and I'd like to still have a life too!) so I may not be able to take on complex custom designs yet - I want to see how things go and not overwork myself so I stay healthy. Just a little disclaimer so no-one expects miracles from me ;-)
Sundress in Cotton Lawn, Size 10
That disclaimer aside I'm really excited to be trying this out and to be sharing my style of hand-made fashion!
The dresses will be available in Pemily's beautiful vintage shop at 7 Holmes Street, Port Adelaide - Pem has such a gorgeous set-up and is such a beautiful person - it was really just her sheer enthusiasm that convinced me to give this a go in the first place. She is also wonderfully talented with hair, make-up and styling - the whole creative package (I wish I had her around when I got married - seriously, her bridal looks are to die for!) She also offers Pin Up Photo shoot packages which are terrific fun and lead to some amazing shots!!

The Dress that Started It All - Vintage 1950's design, not for sale (sorrynotsorry) but if you're interested in a custom version please contact me!
I have a facebook page at www.facebook.com/StaceyMadeFashion Please like and share my page if there is someone you know who appreciates handmade touches and is looking for a vintage-inspired look.
If you like what you see, head on into The Pin Up Lounge to see for yourself and maybe buy something beautiful and handmade!

Sundress in Cotton Lawn, Size 10

Tuesday, 10 June 2014

Gifted Distractions: Quilting with Elephants

Phew!

After the conclusion of the Me Made May Madness I feel as though I have a pile of projects I just want to dive into but I have once again been distracted! 


This time it's by a quilting project - not for me but as a little gift for a lovely collegue about to go on maternity leave. I should also mention I decided to make this quilt only 2 weeks before I wanted to give it... Hmmm time for speedy sewing, so I picked a design that doesn't have to be perfect (at least compared to normal extra-precise quilting designs) I've always wanted to try my hand at rag quilts in flannel fabric ever since I saw one at a craft fair years ago. The flannel is so cuddley soft and the fluffy quilt edges give this type of quilt a more casual, almost shabby-chic appeal.

How cute is this fabric??!! Bright Coloured Elephants!
I used this tutorial and bought my fabric at Tricia's Discount Fabric here in Adelaide. Tricia has a wonderful selection of quilters flannel and I was instantly drawn to these cute elephants! I picked out 2 supporting prints and bought some wool/poly batting as I like how puffy it looks when quilted plus I know it's warm having used it in our bed quilt a few years ago. The staff at Tricia's are fantastic and really know their stuff, if you're in Adelaide it is a great place to shop.

After cutting the seams, before the final wash and dry

I actually was a good girl and pre-washed these fabrics on a cold machine wash so the finished quilt will be machine washable for all those baby messes! The final thing to do after trimming the seams is wash and dry the quilt in a dryer so the seams fluff-up into the rag finish.

The finished quilt after washing and drying
The actual construction went pretty quick - thanks mainly to Mum's invaluable help folding and cutting the squares at the start. I finally learned to chain piece which helped speed things up. In the end this baby was done in about 10 hours! While the finish is not perfect - proper quilters would weep most likely - I really enjoyed this technique and would definitely consider making more of these quilts in the future.


It's quite big for a cot quilt, particularly compared to the normal cot panel size so it will be nice as a top layer in really cold weather or even as a play rug on the floor.

You may also have noticed I have revamped the blog look a little - I'm still playing around with how I want it to look/feel so any feedback on what you like or don't like will be welcomed!

I really wanted to post this last weekend but I didn't want to blow the surprise of this gift so I held off until now. I will be internet free for the next 2 weeks so sadly there will be no blog action until July now.

See you next month!

OXOX

Stacey

Sunday, 1 June 2014

Me Made May '14 - Day 24 to 30

Final week of Me Made May!! This month has shown me a lot and I'm amazed to say I made it through 30 days with only 4 items of Me-Made clothing re-worn.

Sunday, Day 24

Top: Tokito, thrifted from Balmain Markets

Leggins: Cotton On

Socks: Bonds

I did actually wear boots this day since it was our sewing day and yes that is the Fabric Folding Assistants foot photo bombing on the left!

Monday, Day 25

Shirt: Jackie E

Cardigan: Target

Skirt: Made by Me - Kwik Sew 3337

Belt: Target

Tuesday, Day 26

Knit: Target

Vest: Made by Me - Simplicity 2150

Skirt: Jay Jays

Necklace: Ummmm no idea, maybe the central markets somewhere?

This vest was one of those makes where the fit and quality was great but I had no idea how to style or wear it, until I really had to think of garments to wear this month. And I actually love this look and will definitely wear it again - WINNING!

Wednesday, Day 27

Knit: Target

Cardigan: Big W

Pants: Made by Me - Sewaholic Thurlows (blogged here)

Shoes: Target

Thursday, Day 28

Cardigan: Jackie E

Dress: Made by Me - Vogue 8615

Belt: Target

Shoes: Target

Friday, Day 29

Shirt: Made by Me - McCalls 5471 (out of print now - no online resources available)

Jeans: Forever New

Ugh Boots: Kmart

Saturday, Day 30

Top: Made by Me - Lekala Free Pattern 8004

Cardigan: Target

Pants: Made by Me - Sewaholic Thurlows (blogged here)

Boots: Williams

One of the fun parts of taking pictures every day was when FFA (photo bombing here too like a creeper) decided to make a game out of screwing up the pics. Taking photos every day is a pain but is also a great learning curve. I have discovered I have only 2 poses in which I can take a decent looking selfie which means 'proper' blog photos are definitely going to fall under someone else's jurisdiction. However I also discovered I don't look as terrible in photos as I usually think so overall daily photos were a positive experience (thank god they are over now though!)


Me Made May was all about having fun and trying out blogging about sewing to see if this was something I wanted to do. Aside from the annoyance of having to take daily photographs for Me Made May I really do like recording my sewing adventures and sharing them. On a more serious note this whole process has started getting me thinking about what I want to do with my time the most. Sewing and creating really does seem to bring me the most joy at the moment so I'm thinking of ways I can bring more of this into my life now. So Me Made May really was worth the challenge. 

Will keep updates coming if my new plans come to pass!

Thanks Me Made May for the challenge :-D

I'll be back with some more new makes in the coming weeks,

Seeya then!!

Stacey